Special thanks to Courtney Chowning of Brandable Tech for her time and expertise in writing this meaty tutorial for us!
When people visit a website and see the padlock next to the URL they know it’s a sign that the website they are visiting is safe and secure. It’s makes people happy. So how do you get that padlock next to your URL? You do it by implementing HTTPS and SSL.
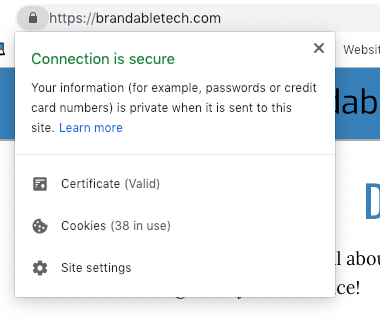
HTTP stands for Hypertext Transfer Protocol with the S standing for Secure. HTTP is the standard a web browser uses to communicate with websites on the internet. So HTTPS is just a secure way for websites to communicate through the web browser.
Without HTTPS any data that is sent over a web browser is sent as clear text, meaning it is not encrypted. This means anyone can intercept it and see the data including passwords and credit card numbers. This is how a lot of hackers mislead users and get personal information. HTTPS is very important not just you personally but to all your customers too.
HTTPS and SSL
To understand how HTTPS works you need to know about SSL too. SSL stands for Secure Sockets Layer and is responsible for establishing an encrypted link between your web browser and the web host of the website you are visiting. To make your website secure and to run over HTTPS you need a SSL certificate that will establish that secure link. If someone intercepts the data between destinations that someone would not be able to read it because it has been encrypted using the SSL certificate.
By using HTTPS and SSL together the padlock with appear in browser when people visit your site and give your customers confidence when visiting.
Along with the security issues there is one more reason to make sure your website is running HTTPS. HTTPS is quickly becoming the new standard for websites and Google is discouraging the use of regular HTTP by penalizing websites. Google will flag any website that doesn’t use HTTPS as unsafe and websites that do use HTTPS are prioritized in search results.
Converting Your WordPress Site To HTTPS
If you have not yet converted your WordPress website to HTTPS, don’t fear. It’s simple to do and I’m going to show you how. There are actually two ways you can convert your WordPress website to HTTPS, an easy anyone can do it way and the hard way, which requires some tech know how.
The first step is to backup your website. You can use a free WordPress plugin such as UpdraftPlus Backup Plugin.
The second step is to purchase a SSL certificate. Many web hosts, Mom Webs included, are including the certificate in their hosting plans now so check with your web host first to see if you already have one. If so great you can move on to the next step. If not you can get a free SSL certificate from Let’s Encrypt or you can purchase one at Comodo or at most domain registration sites. If you have to purchase a SSL certificate your web host support team will be able to install it for you. Once it’s installed you can continue.
The Easy Way
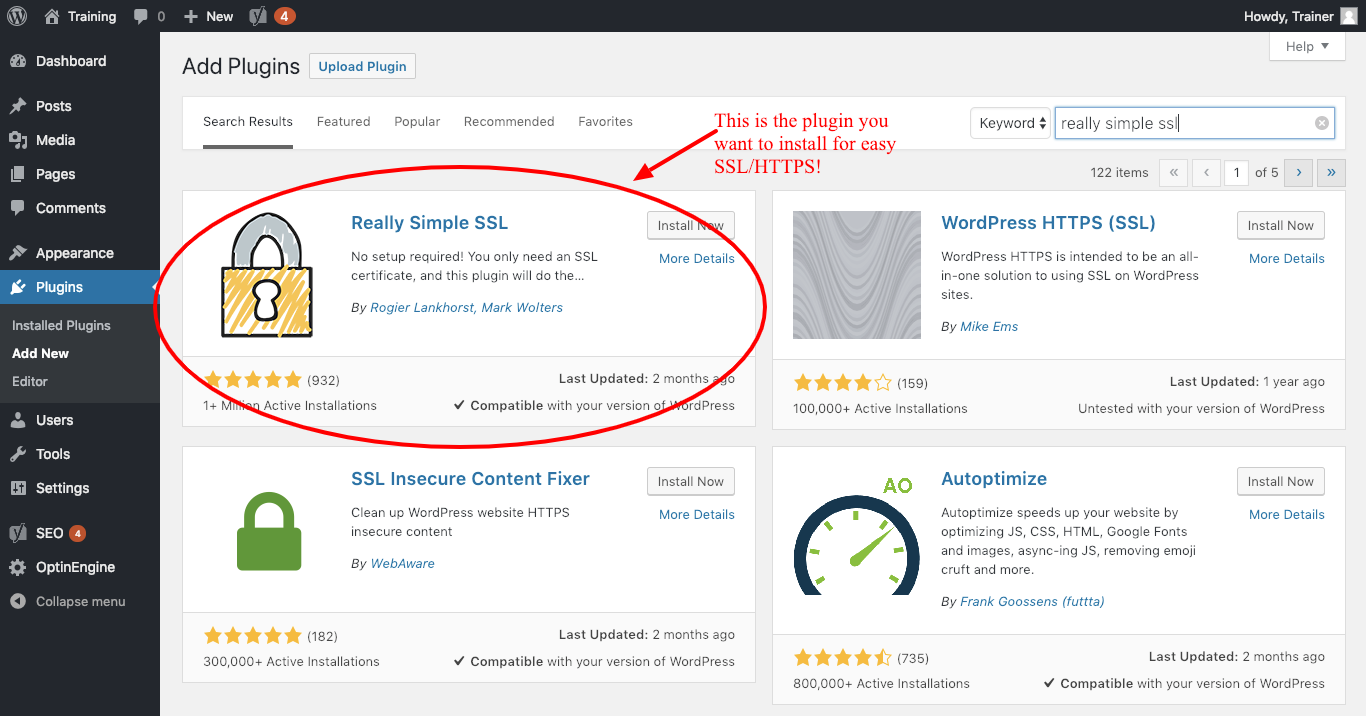
The quick and easy way set up HTTPS on your WordPress site is to use a plugin. I recommend a plugin called really simple SSL. It works like a charm and is free.
Login to your WordPress site with administrative privileges and navigate to the plugin admin page. Click on the button to add a new plugin. Do a search for Really Simple SSL. It should be the first result. Install and activate it.
Once activated you will be shown a message stating you are almost ready to migrate to SSL. To make the magic happen, just click on the blue “Go ahead, activate SSL!” button.
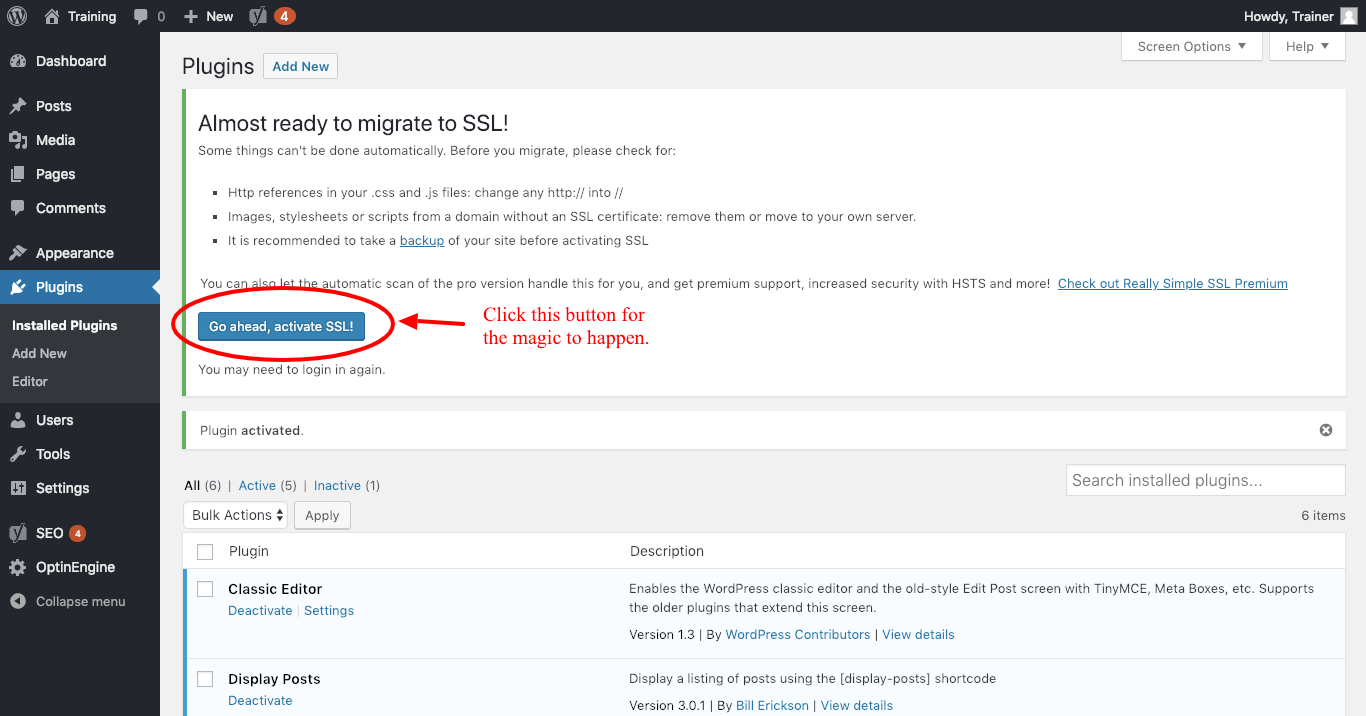
Really Simple SSL will automatically implement the SSL certificate that was installed on your web host and allow your WordPress site to work with HTTPS. The plugin will also set up redirects for any HTTP links to automatically go to HTTPS. It will also look for any content such as graphics that are loaded from HTTP and try to load from HTTPS instead.
The only downside to the plugin is that you have to keep it installed and activated. If you uninstall it you may get some mixed content errors and your website will not appear as secure in web browsers.
The Hard Way
To convert your WordPress site to HTTPS the hard way means doing it manually. Make sure you backup your site before continuing. To manually convert to HTTPS you should be familiar with editing theme files and WordPress configuration files using FTP or through the control panel of your web host.
The first step in manually updating your WordPress site to HTTPS is to update your WordPress address URL and the site address URL. This is found in the WordPress admin area under Settings->General. Simply change the HTTP to HTTPS for both WordPress Address URL and Site Address URL as shown below.
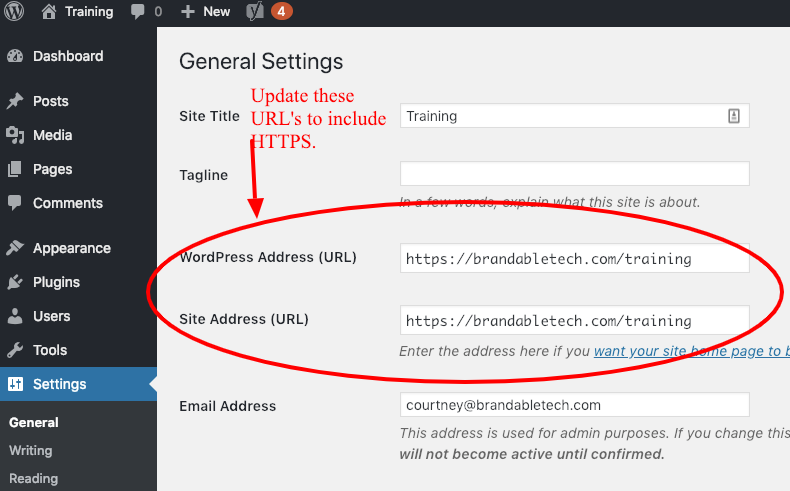
Once you save your changes WordPress will automatically log you out and you will have to relogin.
More than likely you will need to redirect HTTP to HTTPS. This means that anyone who comes to your website using the HTTP protocol will automatically be redirected to your site using HTTPS. To do this you need to edit your .htaccess file. You can do this through the control panel of your web host or you can FTP to your website using a program such as Filezilla, transfer the file to your computer, edit it, and then transfer it back. Below is the code we want to add to the .htaccess file:
<IfModule mod_rewrite.c>
RewriteEngine On
RewriteCond %{HTTPS} off
RewriteRule ^(.*)$ https://%{HTTP_HOST}%{REQUEST_URI} [L,R=301]
</IfModule>
The screenshot below is an example of what your .htaccess file might look like.
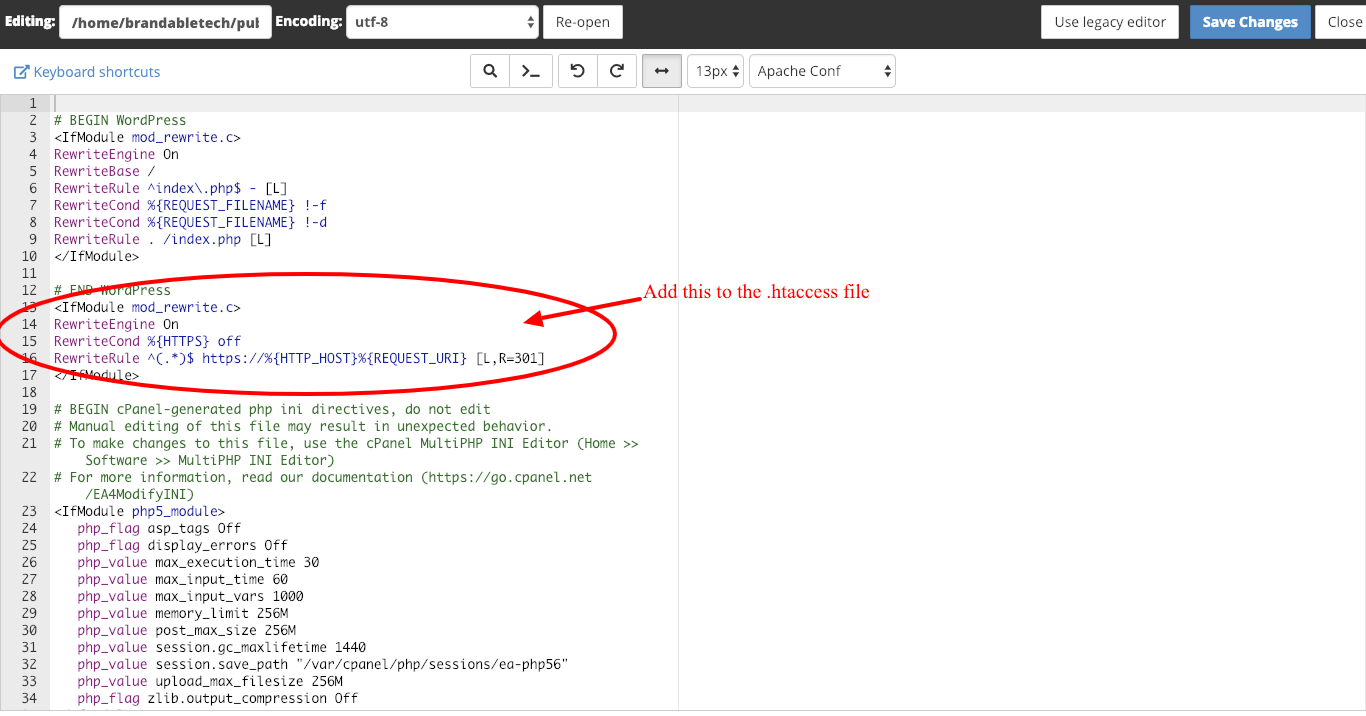
Once you’ve added the code make sure to save the file.
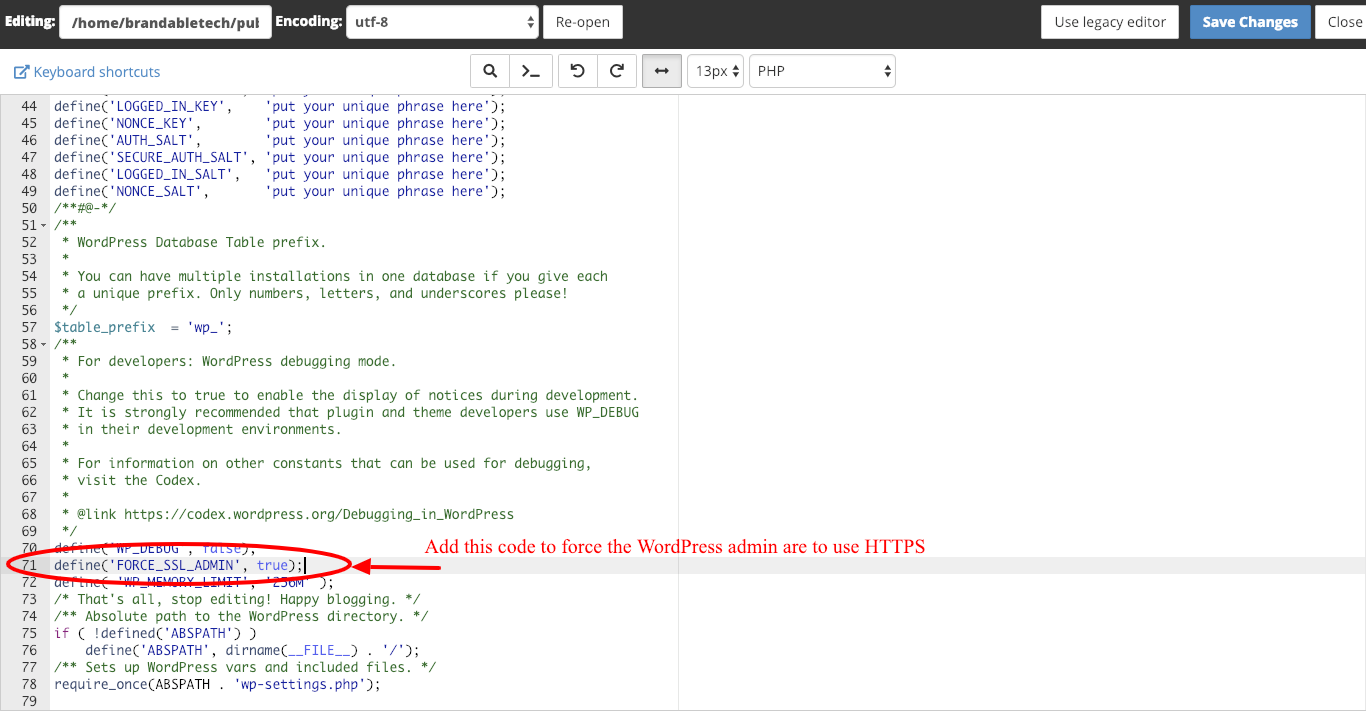
Now WordPress will load your entire website using HTTPS and redirect users using HTTP to HTTPS. This however does not include the WordPress admin area. To force the admin area to use HTTPS you need to edit the wp-config.php file. Again you can do this from the web host control panel or by using FTP.
Add the code below to the wp-config.php file above the line that says “/* That’s all, stop editing! Happy blogging. */”. See the screenshot below the code for an example.
define('FORCE_SSL_ADMIN', true);
Mixed Content Errors
Don’t be alarmed if you visit your site and see security errors stating you have mixed content and the site is not safe. This is because somewhere on your website you are loading scripts or graphics that are still using HTTP in the URL instead of HTTPS. You can see which which items are mixed if you want to use the inspection tool in your browser.
Most of these URLs are in the database and can be fixed in one quick swoop. You can download the Better Search Replace plugin or if you are comfortable using phpMyAdmin from your control panel you can use SQL. Unless you really know what you’re doing though I highly suggest using the Better Search Replace plugin.
Again make sure you have a backup of your site before continuing. From the Add New Plugin admin page search for the Better Search Replace plugin and then install and activate it. Once this is completed you will have a new menu option under the Tools menu named Better Search Replace.
On the Better Search Replace settings page in the search box type in http://yourwebsite.com. Be sure to replace yourwebsite.com with your domain name. In the replace box type in https://yourwebsite.com. The only difference between the two lines should be the HTTP vs. HTTPS. Since you want to update the links throughout your entire WordPress select all the database tables.
Before actually performing the changes, do a dry run first. You can do this by checking the “Run as dry run?” option. You can then review the results before making any changes to the database. Once you have confirmed that the dry run is correct, you can do it again and uncheck the “Run as dry run?” option. The plugin will now update all the links from HTTP to HTTPS.
If you are still getting mixed content errors you may need to check the WordPress theme files and any links you might be using in widgets. If you’re using a plugin that is giving you mixed content errors then I recommend changing plugins since any plugin that is built using the WordPress coding standards will not have content mixed content errors.
Now your WordPress site should be using HTTPS and using a SSL certificate to encrypt your customer’s information when they visit your website.
By the way, don’t forget to update Google Analytics and Google Search Console with the change from HTTP to HTTPS so that your stats and search traffic information stay up-to-date.
Oh Heck, Outsource It!
If you’re one of our clients and you’re not excited to tackle the changes on your own, you can have our team at Mom Webs tackle it for you for a small fee and skip all the possible headaches. Submit a ticket to get started.